WhatsApp Business API
Dive into How to Successfully Set Up WhatsApp Business API With n8n (And Go Live Without Losing New Customers)
Modern businesses are moving away from generic email and embracing direct messaging for sales, support and customer engagement.
One of the fastest ways to automate conversations at scale is by combining the WhatsApp Business Cloud API with low-code workflow platforms such as n8n. However, a common problem occurs when companies initially test with Meta’s default number, then move to a live business number — replies suddenly stop working for new contacts.
In this guide we’ll explain how to set up WhatsApp Business API with n8n, how to take the number live correctly, and the key configurations you must complete in order for new customers to receive automatic replies when they send the first message.
Step 1. Create and Verify Your WhatsApp Business Account
Before anything will work in production, your Business Manager account must be fully verified by Meta. This means:
- Business verification is complete and approved
- A valid phone number (not previously registered on WhatsApp) is added
- A display name is submitted and approved
- Two-Factor Authentication (OTP)** is available for the number
👉 Tip: if a number is currently active on the WhatsApp Business App, go to Settings → Account → Delete my account, otherwise Meta will not allow it to be added to the API.
Step 2. Generate a Permanent Access Token
Meta initially gives you short-lived (24h) tokens, which are great for testing but will cause automation failure if you forget to refresh them.
To generate a permanent (never-expiring) access token, log into Business Manager and:
- Go to Business Settings → Users → System Users
- Click Add → choose Admin System User
- Assign the user access to your WhatsApp Account with the permissions:
- whatsapp_business_messaging
- whatsapp_business_management
- Click Generate New Token
- Choose the “Never Expires” option
✅ Copy this token and save it securely.
✅ Paste this token into the WhatsApp Cloud API node inside n8n.
Step 3. Set Up the Webhook in Meta
From Business Settings → WhatsApp → Webhooks, configure:
- Callback URL → your n8n webhook URL
- Verify Token → any text (must match the one in n8n)
- Subscribe to:
✅ messages
✅ message_status (optional — for delivery/read tracking)
❗ Make sure the webhook is attached to the LIVE phone number, not the test number. Test numbers and live numbers keep separate histories and settings.
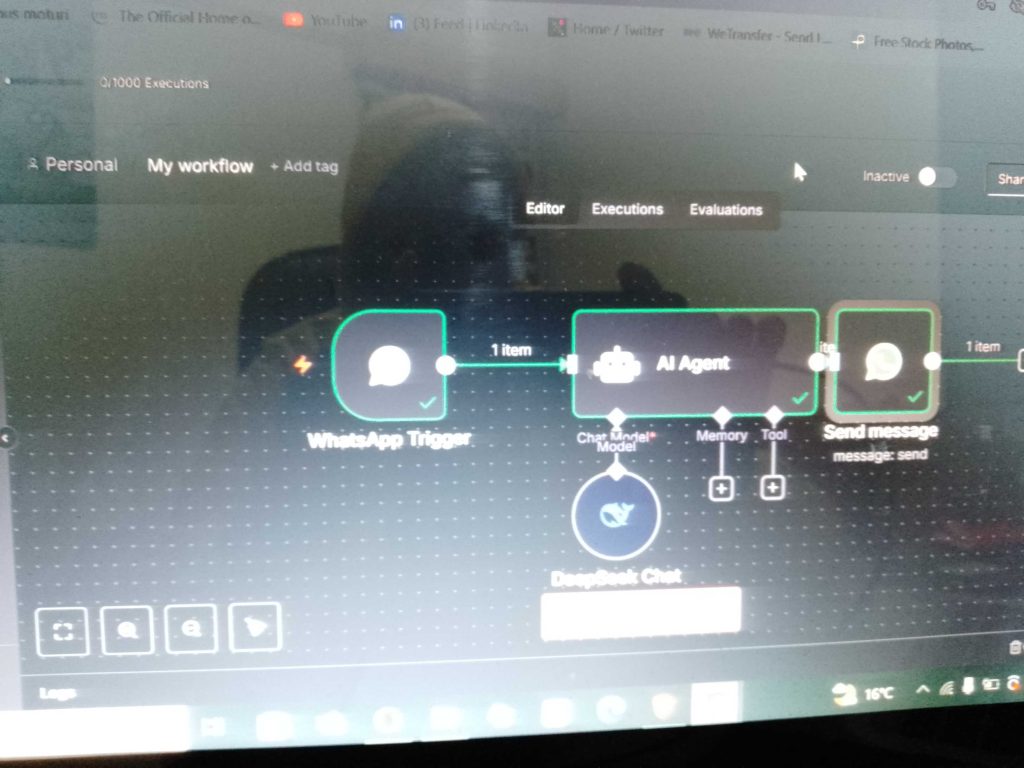
Step 4. Plug Everything Into n8n
Open your workflow in n8n and confirm:
| Field | Value |
|---|---|
| Access Token | Your permanent token |
| Phone Number ID | The ID of the live phone number |
| Webhook Trigger | Listens for the messages event |
| Reply Step | Sends a normal text message |
👉 The most common reason new customers don’t receive a reply even after sending “Hi” is because the Phone Number ID in n8n is still pointing to the old test number.
You can find the correct ID here:
Business Settings → WhatsApp → API Setup → Phone Number ID
Step 5. Important Meta Messaging Rules (Why “New” Numbers Don’t Get Replies)
Even when everything is configured correctly, WhatsApp will only deliver a normal text message if the user has already initiated the conversation by sending you a message.
| Scenario | Will WhatsApp deliver your reply? |
|---|---|
| User sends the first message → You reply with normal text | ✅ Yes |
| You send first (without template) | ❌ No |
| You send first, using an approved message template | ✅ Yes |
Therefore:
✅ New customers must send a message (e.g. “Hi”) before receiving an automated response
OR
✅ You send an approved message template to initiate the conversation
To enable outbound “welcome” messages to new numbers, go to Business Manager → WhatsApp → Message Templates, create a simple template like:
“Hello {{1}}, thanks for contacting Samtash Media. How can we assist you today?”
Once the template is approved, use the Send Template operation in n8n for first-contact scenarios.
Step 6. Activate and Test Your Live Flow
Final test checklist before going fully live:
- Permanent access token is in place
- Phone Number ID matches the live number
- Webhook is subscribed to messages for the live number
- n8n workflow is activated
- A test user sends a message → webhook receives it
- n8n replies automatically
Tip: go to Meta → Webhooks → Recent Logs and confirm the messages events are being delivered to your callback URL.
Conclusion
Integrating WhatsApp Business API with n8n is a powerful way to automate customer support and lead qualification but it only works correctly in live environments. If your webhook is subscribed to the right phone number, your Phone Number ID matches, and you understand Meta’s messaging rules for first-time contacts.
By generating a permanent access token, activating a message template for first-contact scenarios, and confirming your webhook is firing. You’ll ensure new and existing customers receive real-time responses from your WhatsApp automations.